Group Setup Instructions
How to set up groups:
1. Go to Setup\Session Catalog
a. Setup the CPT code in the session catalog, if one is not already present.
This step only has to be done once if you use the same billing code and fee amount for each group.
For example, groups 1-10 all use the same billing code 90853 and the fee is the same for each.
So I will setup one CPT code - 90853 and call it Group Therapy.
When I schedule groups 1-10 I will use Group Therapy as the CPT code.
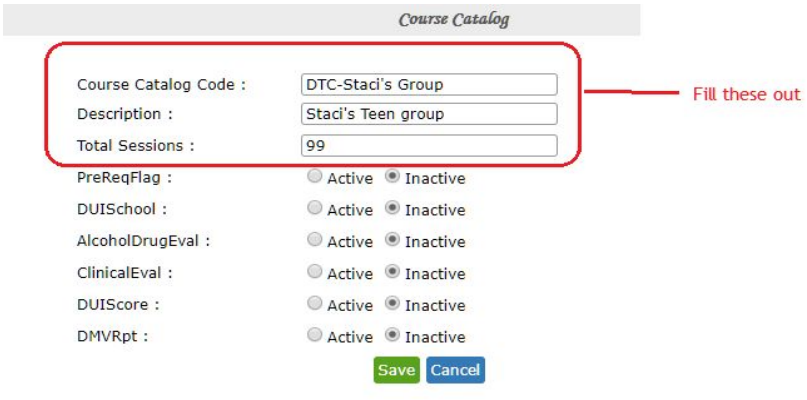
 2. Go to Setup\Course Catalog (If you do not see this option, call us to add the permission)
a. Select Add new at the bottom of the page
i. Enter the Course Catalog Code (Name of group EX:Staci’s Group)
ii. Enter the description - This is what shows in the drop-down when adding a client to the group
iii. Enter Total Session - Use 99 if it will be running indefinitely
iv. Skip everything else and select Save
2. Go to Setup\Course Catalog (If you do not see this option, call us to add the permission)
a. Select Add new at the bottom of the page
i. Enter the Course Catalog Code (Name of group EX:Staci’s Group)
ii. Enter the description - This is what shows in the drop-down when adding a client to the group
iii. Enter Total Session - Use 99 if it will be running indefinitely
iv. Skip everything else and select Save
 b. You are now back at the Course Catalog page
c. Find the name of the group and go to the right on that line
d. Click View Class List
b. You are now back at the Course Catalog page
c. Find the name of the group and go to the right on that line
d. Click View Class List
1. Select the Description of the next CPT code
2. Leave the session number at 2
3. Click Save
4. Repeat until all CPT codes have been selected.
v. If you do not need another CPT code for the group
1. You are done with this page.
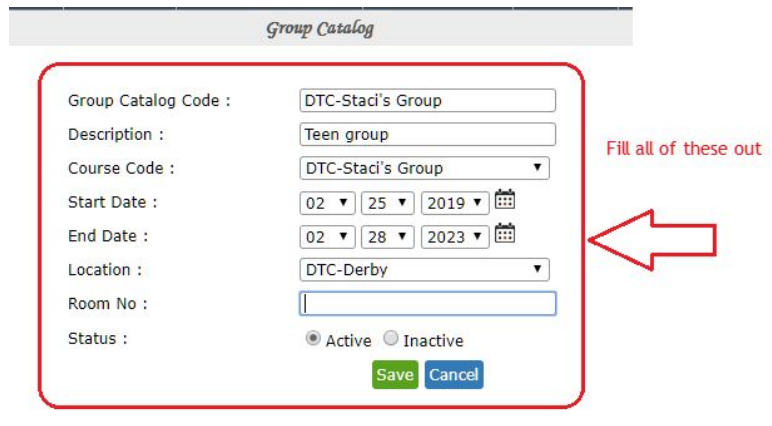
3. Go to Setup\Group Catalog (If you do not see this option, call us to add the permission)
a. Select Add New at the bottom of the page
i. Enter the Group Catalog Code (Name of group EX: Staci’s Group)
ii. Enter the Description - This is what shows in the drop-down when adding a client to the group
iii. Select the Course Catalog Code created in step 2 from the drop-down
iv. Select a start date - This is typically the day prior to the first group appointment
v. Select an End Date - Give it a few years
vi. Select the Location from the drop-down if you have more than one
vii. Enter the Room number or N/A
viii. Make sure the Status is Active
ix. Select Save
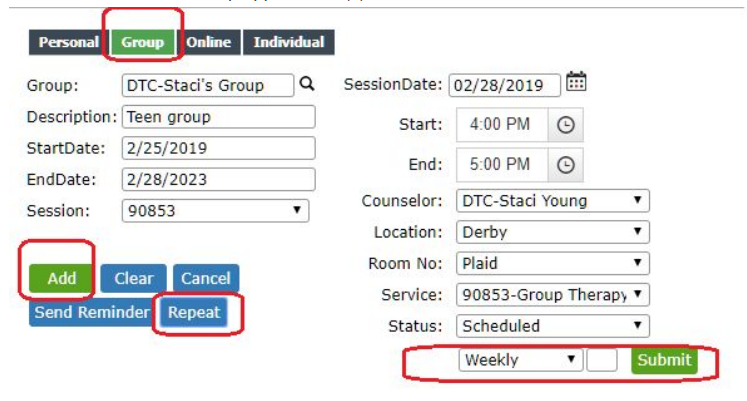
 4. Go to the Calendar
a. Schedule your first appointment on the calendar
i. Select a time slot in the calendar.
ii. Click on Group
iii. Click on the magnifying glass and select the group name
iv. Make sure your time slot is correct
v. Verify Provider is selected and Service is populated.
vi. If you want to set up a repeating appointment
1. Select Repeat
2. Select the frequency from the drop-down (Weekly, Biweekly)
3. Enter the total number of appointments you want added to the calendar
4. Select Submit
vii. If you do not want to set up repeating appointments
1. Select Add
viii. Group appointment(s) are added to the Calendar
4. Go to the Calendar
a. Schedule your first appointment on the calendar
i. Select a time slot in the calendar.
ii. Click on Group
iii. Click on the magnifying glass and select the group name
iv. Make sure your time slot is correct
v. Verify Provider is selected and Service is populated.
vi. If you want to set up a repeating appointment
1. Select Repeat
2. Select the frequency from the drop-down (Weekly, Biweekly)
3. Enter the total number of appointments you want added to the calendar
4. Select Submit
vii. If you do not want to set up repeating appointments
1. Select Add
viii. Group appointment(s) are added to the Calendar
 5. Now it is time to assign your clients to the group
6. Go to the Group\View Clients (If you do not see this option, please submit a ticket to add the permission)
a. Note: This can also be accessed via Individual\View Clients
b. Click on the client that you want to assign to the group - This will bring you to their registration
page
c. Click on the Group tab at the bottom of the page
i. Select the group from the Group Catalog ID drop-down - This will be the description you
entered for what the group is for
ii. Enter a start date - This can be the day before or day of the first meeting they will attend
iv. Select Save
d. Repeat steps a and b for all clients you want to add to the group
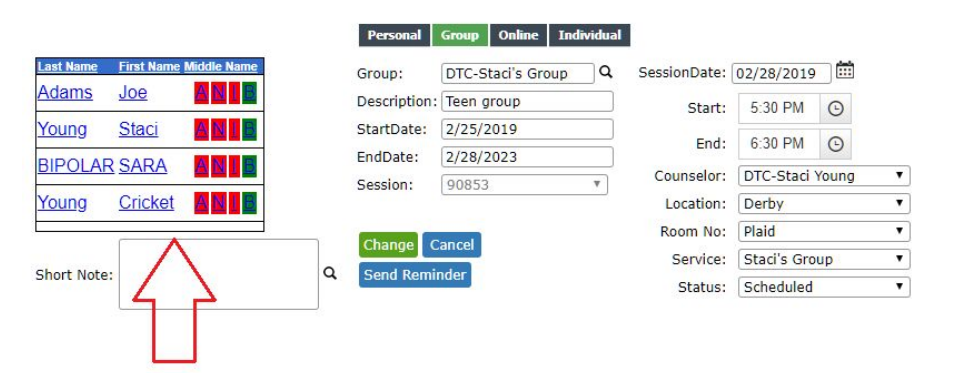
7. Go to Calendar
8. Click on the pencil in the group appointment slot
a. A list of clients assigned to the group should now be present
5. Now it is time to assign your clients to the group
6. Go to the Group\View Clients (If you do not see this option, please submit a ticket to add the permission)
a. Note: This can also be accessed via Individual\View Clients
b. Click on the client that you want to assign to the group - This will bring you to their registration
page
c. Click on the Group tab at the bottom of the page
i. Select the group from the Group Catalog ID drop-down - This will be the description you
entered for what the group is for
ii. Enter a start date - This can be the day before or day of the first meeting they will attend
iv. Select Save
d. Repeat steps a and b for all clients you want to add to the group
7. Go to Calendar
8. Click on the pencil in the group appointment slot
a. A list of clients assigned to the group should now be present
Related Articles
Instructions for Supervisor Setup
Supervisor Settings Supervisor - Setup Tab > Provider/Staff Check These Boxes QA Staff No Supervisor Signature Required Save at bottom of page Therapist (Supervisee) - Setup Tab > Provider/Staff Supervisor Dropdown to the right of the page Select ...How to setup and insert an electronic signature
To set up your signature: 1. Go to Setup\Provider\Staff 2. Select your name (in blue) 3. At the bottom left, there is a field for electronic signature 4A. Select the Sign button to use your mouse or a touch-screen. 4B. Use the Choose file button ...Client Billing Automation
Automation Setup: 1. Go to Setup\Company Info 2. Select the Statement Settings button in the lower right 3. Select the Billing Frequency for the Client Billing Statement from the drop-down 4. Select which email address to send the email to from the ...Setup/Company Info Instructional Demo
Billing changes
For any billing changes: Adding new providers Inactivating accounts or change in settings Please follow these steps You will have to be the account owner, go to the setup tab, go to Therasoft Billing and request change you will then be instructed ...